OFNA/Hong Nor X1X-CR to X1X-CRE (Brushless conversion)
Contents
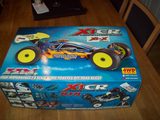
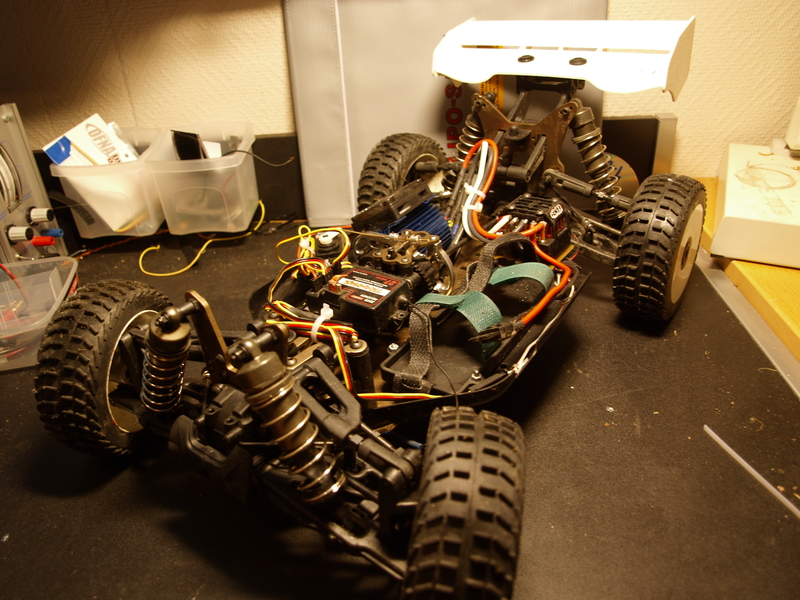
My first step into 1/8 scale offroad racing is a Hong Nor X1X-CR 1/8 buggy, arriving as a nitro car destined for conversion to brushless electric drive.
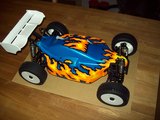
Electric has become a “standard” for my cars, and brushless my standard for offroad. So the buggy will be no worse that my other cars, and is given a brushless conversion. The -E extension of the model-name reflects my electrification 😛
The X1X-CR is a factory-made options-upgrade of Hong Nor X1-CR RTR. The X1-CR RTR is a “parts-downgrade” of what Hong Nor calls X1-CR Pro, this kit is available under a more familiar name as OFNA Jammin X1-CR. The kit I am based on is a “80% RTR” kit, meaning no engine or electronics are included.So the start of brushless conversion was as simple as removing only a handful of parts.

Brushless conversion
Drive train
I wobbled a bit back and forth on what kind of mount and drivetrain setup I was going to use. I knew I wanted some way of removing some of the stress the motor will receive on impacts from jumps, hard turns and crashes. I have seen a few direct-drive setups bust the rotor of pricey bl-motors already, and I consider removing that possibly weak-spot a sound investment.
This decision does in fact determine most of the non-electric parts used in the conversion, so it is important to do this first, and get it “right”. Two major options exist. Either go for a direct drive build, and use a RC Monster slipperential in place of the center differential, or go for a setup that uses the Tekno RC Electri-Clutch. This uses a more “traditional” nitro-like setup, and is way less expensive than the RC Monster option, but has significant limits int that it sacrifices the endless tuning-possibilities of the Slipperential. For motor-mounts, it has to be one that allows direct use of a clutch-bell, or some creative thinking in regard to mounting of the center differential. For mounts that allow direct use of a clutch, the options are to buy a motor mount from Tekno RC, build a mount from scratch, or buy a square-can Lektron Brushless Motor. Tekno RC does not make a X1-CR(T)-compatible mounting-plate for their 32×32 motor mounts or the square-can, so to use the Tekno motor mounts or the square-can, I would have to do the machining of this myself.
A Castle Creations conversion kit was an alternative, but I really did not like that route.
I was for a long time considering going with the RC Monster Slipperential, partly because it would allow great flexibillity in use of motor mounts, partly because it would be a drop-in part, and lastly because of the ease of tuning. But, in the end I decided I did not like the cost of the kit, running a steep $120. In stead, i payed $20 for the bare Electri-Clutch without the bell and other Tekno parts, plus $4.29 for a set of clutch-springs . To the adapter I added the H-N clutch-bell and shoes that came with the X1X-CR-kit.
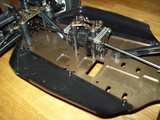
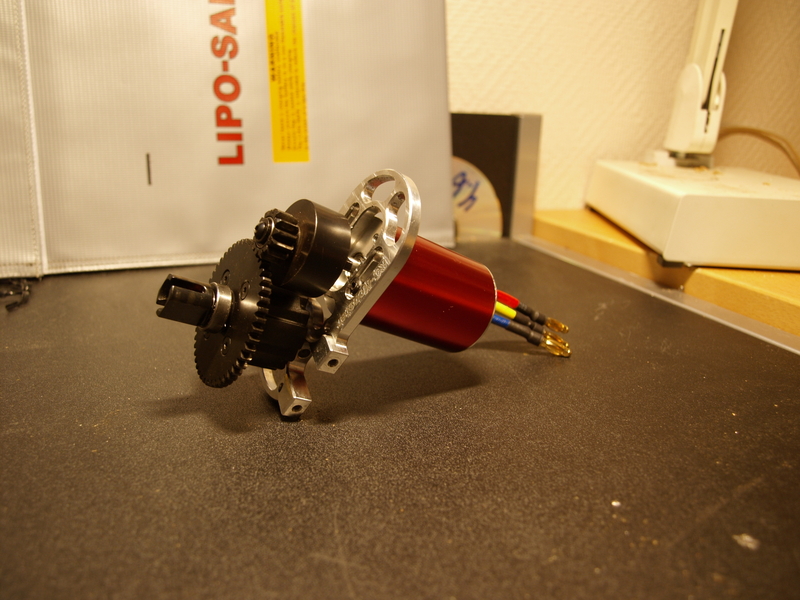
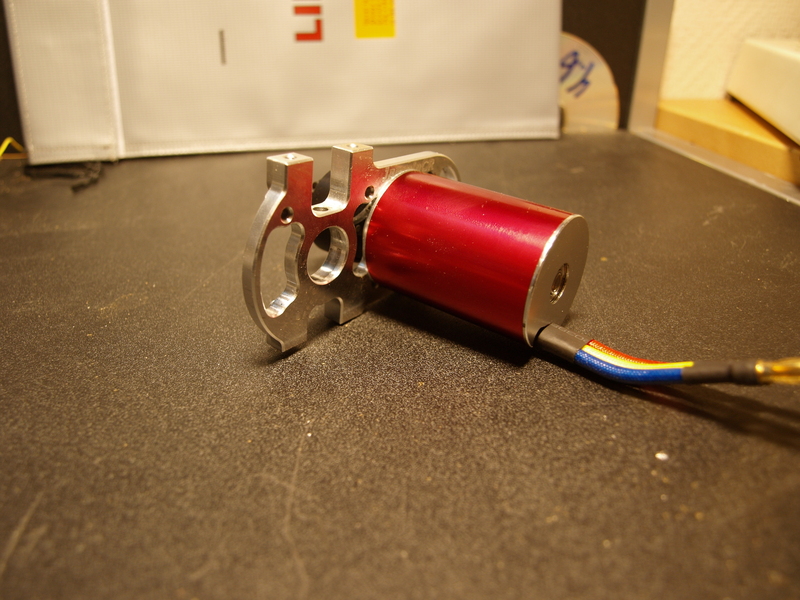
The first mount that went into the car is the Ofna CR Buggy brushless motor mount from RC Monster. This motor mount replaces one of the center-diff posts, and is originally suitable for direct drive with a simple pinion gear. The solution to allow the use of a clutch bell was to grind out a new opening in the base plate for the spur gear, and flipping the center diff. The clutch nicely clears the casing on the differential, and the meshing of the pinion and spur is practically ideal.
ESC, Electronic Speed Control
As a geek with an electronics background, the electrics fascinate me, and for things like the speed control, I tend to get hung up on reading data sheets, specs and drooling/dreaming. So it took me a good long time to select the ESC.
I was for a while looking seriously at cutting cost, and at the same time getting rather unbelievable specs for the price, by going with a HobbyWing ESC in a kit: HobbyWing Xerun 150A ESC and 4274 2000kv brushless motor. The same ESC is also branded with HobbyCity/HobbyKing's “alternate brand”, Turnigy. All in all the HobbyWing/Turnigy ESC has received overall good reviews and comments, and has a very low price-point. But, the RC-related forums are also full of comments about ESC burn-out and flaky support, so it may seem this ESC lives up to its brand name, in that it either works beyond expectations, or burns up catastrophically. Not really an option when talking about the most expensive single part on the car.
So, eliminating HobbyWing and derivatives, rebrands and clones of it, and also cutting from the competition any brands that fall in the same “perfect or explodes” category, I started looking at the more “established” brands, with a rough baseline.
I knew I wanted to be able to experiment with voltage levels, so I wanted an ESC that could do a wide range, preferably LIon-sizes 2S to 6S inclusive (7.4-22.2V). I also wanted to have “more than the battery” capacity of current, with a max-rating of no less than 135A. This limited my options. Drastically.
-
Team Losi 1/8 Xcelorin Sensorless ESC has very amp ratings at 160A continous, 800A peak, but gets cut short by only supporting 3S, 4S and 5S battery configurations. Pricing as of may 2010 is $249 MSRP, $189 in some stores.
-
Castle Creations Mamba Monster Max is a very popular choice. It bugs me greatly that such a popular product has so poor documentation on specs, there is no official documentation that I can find that actually list full specs. All information is “up to”-information. So, to get a cloudy, but close picture, I have gathered from forums and the like that is seems to allow 6S voltage, but 3S to 6S cutoff levels, a peak current of 800A, but a continuous current of 120A. So, lacing the 6V cutoff and the 15A up to 135A I chose not to go for it. Price as of may 2010 is $169 in selected shops.
-
HPI Racing seemed to have an option for a while, with the HPI Flux Blur ESC, but after researching it, being frustrated of lacking documentation, and studying the build, comments and reference materials, it turns out the FLUX Blur is simply a rebranded CC MMM. Interrestingly, it actually sells for a tiny bit less than the Mamba: $164.
-
Tekin builds the Tekin RX8 brushless ESC. Highlights for this ESC are 6V/5A BEC, 210 Amp continuous, over 800A peak, selectable 2s to 6s LiPo operation, programmable throttle profiles, adjustable timing. It is just a little bit steep as the first ESC, as I am almost guaranteed to fry the first ESC while learning how to handle the car 🙂 The running price I've found as of April 2010 is $200.
I started looking at specs, thinking and planning in January. When April arrived and I still had not made a decision, I sat down, looked at the candidates with the goal of selecting and ordering. Considering the risk of going with HobbyWing, I started comparing amp-ratings, cutoff-voltages and tuning-features to prices. As the range prices were $35 apart on the best prices I could find, I decided the specs of the RX8 was absolutely worth it, and ordered.
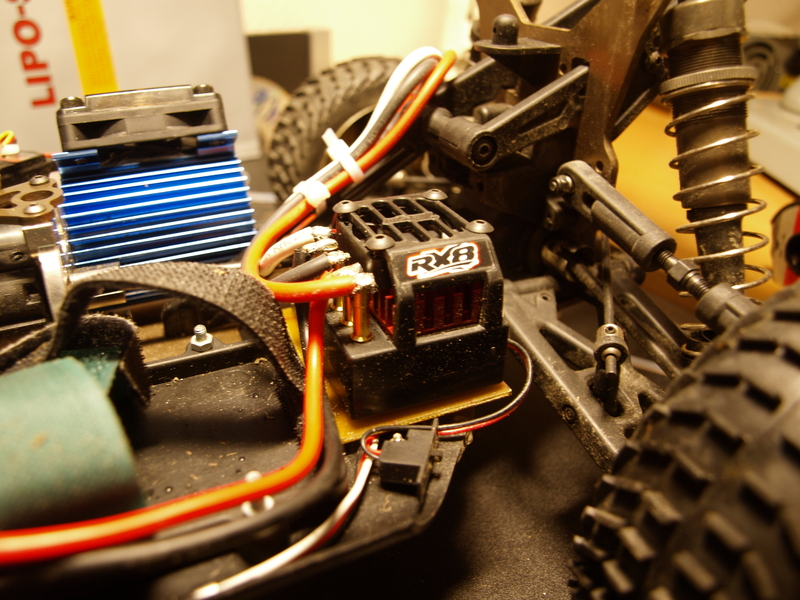
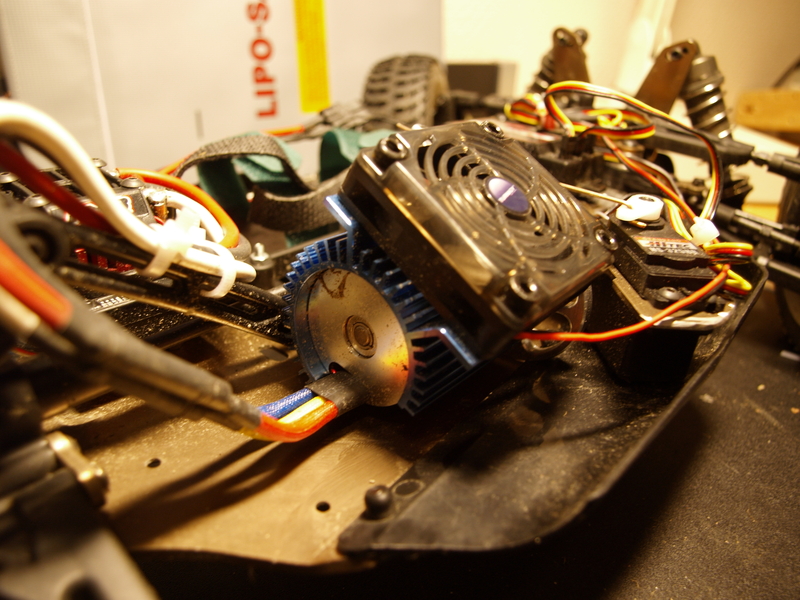
A note about the RX8 in use. The heat-posts that double as connection posts are notoriously efficient temperature conductors, making the soldering of heavy-gauge wires a real task… Tekin has put out a YouTube video showing how to do this properly. When the guy in the video says “make sure you have a nice hot soldering iron” he is by no means joking. I ramped my 45W iron to 440 deg C and was still getting frustrated… I also ran my wires out to the side, I do believe it would have been easier to run them upright like Randy does in the video.
Motor
Brushless motors exist in a very wide variety, with a likewise wide variety of sizes and ratings. For this conversion, I obviously need a motor that will be able to handle ~4kg of car. During the build-up of the mechanicals, I did a test run where I bolted on my Traxxas Velineon VXL3 ESC an Velineon 3500 motor. It seemed to me (at least on snow) that running a 3500KV motor on 11.1V (3s) will be able to do the job. But, the Traxxas motor has a 3.175mm shaft, and that turned out to be too little to handle the stress, as it snapped cleanly off the motor! So, the shaft has to be at least 5mm diameter.
The KV, or RPM-to-Volt ratings of motors, combined with the power/amp rating will tell you quite a bit about the suitability to a given set-up. A high KV rated motor will be able to give high speed, but at the cost of torque. Also, high KV motors tend to be fairly low on the Watt-rating. A medium KV motor with a low power rating will be no better in torque, but crank those watts up, and it will turn into a speed-and-torque combination. If what you are after is very high torque, a motor with a low KV rating will give just that, even at lower amp's. Hovever, a low KV motor will require higher voltage to give you good speed.
It is just because a high-kv, high-amp motor with a fairly low voltage may give similar results as a low-kv, low-amp motor that I have put so much thought (and money) into selecting an ESC with as high as possible range on both voltage and current. This should allow me to experiment with motors and voltages.
A common route for 1/8th conversions is to go with ~2-2500KV motors run with 4S LiPo batteries. I already have the Rustler, my Quadrocopters and various other battery-powered gadgets running on 11.1V 3S LiPo batteries (and Traxxas Highpower connectors), so I am starting out running the same on this car. This means I need to compensate for the 3.7V drop in voltage by increasing the KV rating. With the experience from the Velineon kit, I man starting out with a 60A 3200KV inrunner from HobbyCity. I also have a 78A 3000KV of the same series. All the 3C LiPo batteries in my stock, except one, will be able to provide continuous current above 80A.
Battery mount
To prevent the battery from banging around int the car, to keep it on one place, and to balance weight a bit, the battery needs to be strapped down securely. To do this, I got a Tekno RC V3 Universal battery tray that I have mounted slightly raised from the chassis bottom so that it clears the side guard. On the tray, I have mounted lengths of velcro straps to secure the battery in all directions.
Brakes
Brakes are for pussies, sissies and wimps. Okay, so it seems I am one of those. Since I am using a clutch in this build, I will not be able to rely on the motor for much breaking, and even though breaking is the opposite of going fast, and going fast is very important in a race, keeping control is also an important factor in racing. Breaks are part of the tools you use to keep control. This is why I have disc-braking on the car.
The RC Monster motor mount has (in my eyes) a flaw that makes it impossible to use the break-assembly on the side of the differential where the motor-mount replaces the original differential mount. Also, the position of the engine can does not allow the space for the brake discs on that side. For this reason, I only have braking on the side of the differential there the original differential post is used. This means I only have mechanical brakes on the front wheels.
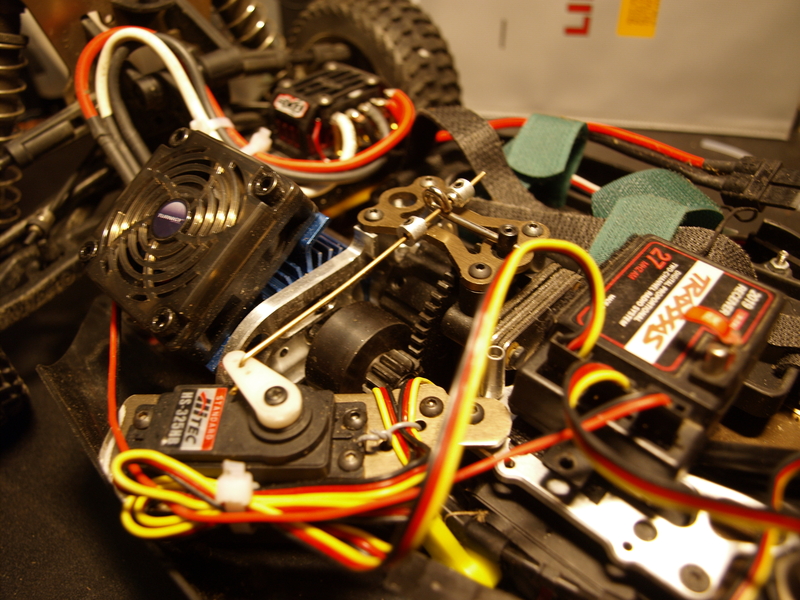
My current mechanical setup of the servo for the brakes is really not optimal. The servo is mounted on a plate extending from the steering-servo mount, and ends up being slightly higher than a standard buggy body shell is in that spot, resulting in me having to cut an opening in the body shell at that point. I'm not at all happy with this. I suspect that the force required to get adequate braking is low enough to allow me to use a mini- or even micro servo. This will be experimented on, and I hope to get a better mounting arrangement for the brakes in time.
My current radio also only has two channels and no mixing, so I am using a simple server Y-harness on CH2 to split the signal going from the receiver to the ESC. The ESC is set up with minimal motor braking and no reverese, so hitting the throttle-control in reverse actuates the brakes, with the motor only slightly braking.
Parts list
I am keeping tabs on what parts are going into this build, and also trying to keep a tally of the cost. Want to try a similar conversion? This is what I have used (so far). The parts list does not contain “upgrades”, as I list those in a separate section further down.
| Part | Price | Link |
|---|---|---|
| Hong Nor X1X CR STD 80% kit | $325.00 | Shop |
| RC Monster Brushless Motor mount - Ofna CR Buggy, X2 truggy | $49.99 | Shop |
| Tekno RC 1/8th Elektri-Clutch Adapter | $19.99 | Shop |
| Tekno RC 1/8th Clutch Springs 0.7mm | $4.29 | Shop |
| Tekin RX8 1/8th Scale Competition Brushless ESC | $199.99 | Shop |
| Tekno RC V3 Battery Tray (all V3, universal) | $9.99 | Shop |
| KD36-50-11S - KD36-50-11S 3200kv Brushless Inrunner | $27.95 | Shop |
| FAN5010-3665 - TURNIGY Heat Sink with Fan for 36 series. | $4.79 | Shop |
| Hitec HS-325HB Standard Heavy Duty servo for steering | $12.99 | Shop |
| Hitec HS-325HB Standard Heavy Duty servo for brakes | $12.99 | Shop |
| Total cost (so far) | $667.97 | |
Buggy to Truggy?
I am pondering the idea of rebuilding the buggy to a truggy, as I have not yet decided if I like buggies yet 😛
With the X1-CR, it should theoretically be a simple job to build the X1-CRT, Hong Nor/OFNA's truggy model. The parts that need replacement are as far as I can tell:
-
Chassis plate
-
Chassis braces
-
Front shock tower
-
Front upper and lower arms
-
Rear shock tower
-
Rear upper and lower arms
-
Drive shafts an universals.
This sounds like a lot of parts, almost a complete build, but when looking at a build manual, one realizes that it is really quite few, compared to the amount of parts on the cars total.
Not yet decided, it will be a significant cost and work, and I want to get a feel of the car first.